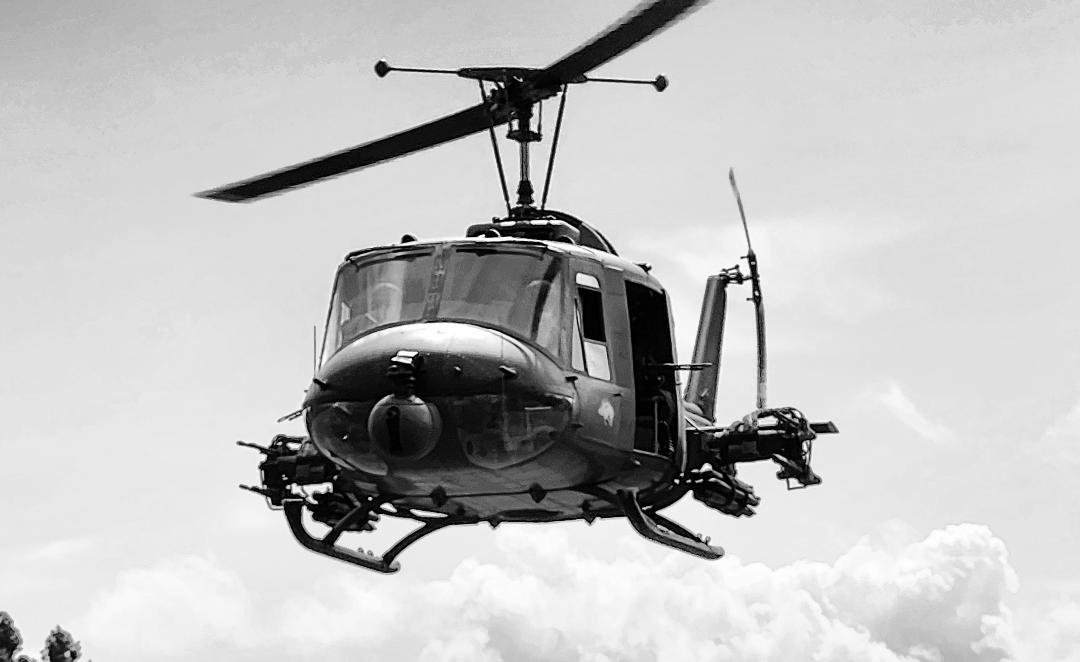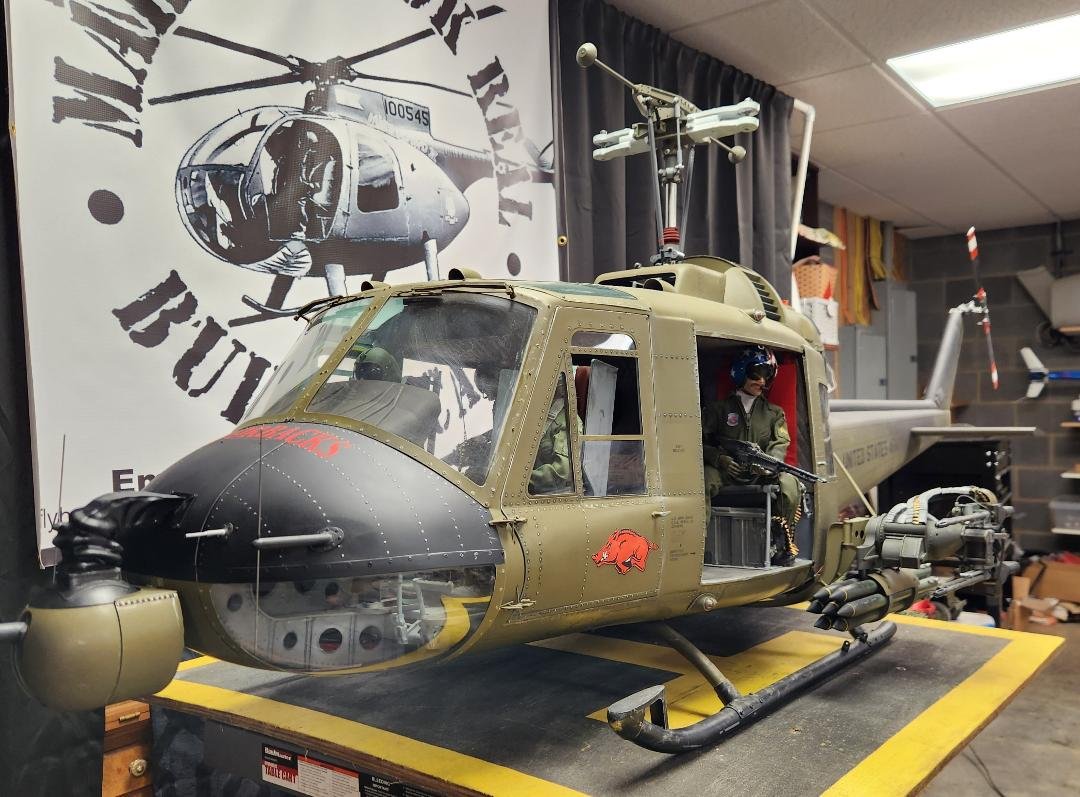


We all have our favorite models and out of the many that I have built I will have to say this 1/5th scale Heli-Factory Bell 204 has been the most enjoyable to build and all the videos that you have seen show the smooth and realistic scale flying that is capable from this model. I chose to make this Bell 204 into an early Vietnam version of the Huey UH-1C Gunship. As with all the FS series kits from Heli-Factory this one came with all the exterior details such as the rivets, raised panels, panel lines and latches applied to the fuselage during the manufacturing process. The change from a Bell 204 into a “C” model was accomplished by adding a very nice 3D printed “Particle Seperator” from Scale-Print. The complete cockpit, and a few additionl exterior fittings and the external armament also came from SCALE PRINT. I am an “old school” scratchbuilder but am getting more and more fond of 3D printed parts. I consider myself a very accomplished “scratchbuilder” but there is “no way” I could replicate many of these fine and accurate printed parts. This is the first model that I have built with such accurate detailing. Of course I had to paint and weather the model and with a great idea from my good friend Randy Rivers ( retired ARMY pilot ) I added a few authentic “Air Cav Stetsons”.
When the model arrived it was in white primer and needed very little attention to be ready for paint. Everything fit perfectly and after installing the Motor, ESC, and electronics it was “flight time”. It flew perfectly and after three flights it was disassembled and off to the back yard for paint. I had researched the correct color for this early Vietnam gunship and found it for purchase from Gallespie Coatings, the correct number is FS34087. After the paind cured I applied the markings from Callie Graphics. I started the weathering process with a “black wash” around the rivets and all other exterior detailing. I used zinc chromenate and silver paint to replicate the worn areas around the doors and openings. When satisfied with this step it was time for the exhaust soot on the tail boom. I use flat black paint and apply with an airbrush. I wanted this model to look like a well weathered combat helicopter that had not seen a good cleaning in several flights. After applying the soot I shot a light coat of “Testors Dull Coat” over the entire fuselage, this protects the weathering and seals the graphics. This Testors paint can still be purchased from Amazon. This is the most “flat gloss” I have found with absolutely NO gloss which was perfect. After installing the mechanics it was time for all the exterior detail and side guns and rocket launchers from SCALE PRINT. These guns are what gives this model the “Gunship” look that I was wanting. The armament kit is supplied with the “pedestal mount” for the M-60’s but I wanted the rear door gunners to be holding the 60’s instead, you can see the difference in the pictures. The armament kit is supplied without ammo in the feed belts and I founf the perfect solution from “Goat Guns”, they had .50 caliber rounds in 1/4 scale which looks great as 7.62 in 1/5th scale. These are packaged seperatly and had to be placed one at a time which took a few sessions at the bench,lol. My wife made the quilted soundproofing material you see in the rear cabin, the ammo boxes under the bench seat are another item purchased from SCALE PRINT. The case of beer, case of MCI ( before MRE’s ) and granade crate came from Ebay. The Stetsons were the idea from Randy Rivers and printed by Mark Burks at Micro Designs. The pilots and crew came from Tailored Pilots in the UK and made in 1/5th scale to fit the model perfectly. They were weatherd as well right down to the dirt on the boots, the patches were downloaded, reduced to scale, printed and cut out and glues to the flight suits and helmets. The “Stars and Stripes” helmet has a story. Ryan Witchey, one of our group members sent me a picture of a door gunner with a helmet painted like this one and he ask me if I could incorporate it into the build and I did this for him,lol. Thanks Ryan, great idea.
It is powered by a Kontronik Pyro 1000 which is controlled by a Kontronik 200 ESC. This ESC gave me the ability to have a 50 second spool up of the main rotor, that coupled with a fine sound system from Model Sounds Inc gave me a most realistic start up with full size turbine sound matched to a realistic slow spool up of the rotor. I fly it in governor mode with a head speed of 875. The model runs on 10,000 mah Spektrum Smart Batteries and is controlled by Spektrum electronics and a Bavarian 3X controller, all of which are controlled by my trusty Spektrum iX14 transmitter.

Update on the Huey. I was never quite happy with seeing nothing behind the engine cowling but empty space when I knew I should be seeing a T53 Turbine engine. Rossell Rohan at R&R ScaleWorks printed this very fine looking T53 for my Huey. It makes the world of difference, especially on static display.
I decided to make a final change to the overall appearance of this model. I always wanted the nose mounted 40mm grenade launcher and finally found a solution again with Russell and George Baker. Russell printed one but the grenade feed chute was not accurate, George Barker printer a feed chute that looked much like the fabric covered ones on the full size gunship. I was able to use the launcher from Russell and the feed chute from George and the results suited my requirements perfectly. I had already found a gunship platoon “ Razorbacks” which operated the “C” model with the same armament package as my model and it included the 40mm nose mounted launcher. I now have exactly what I wanted in this model.