


Building A Scale Helicopter
Please keep in mind that my building methods may be different from other builders. I use the “KISS’ method and it has worked out very well for me.
My goal has always been not to just build a scale model but to build one that looks and flys as realistic to the full size as possible. Most anyone can BUY a scale helicopter that looks like a full size, but does it look like a big model or does it look real, right down to the worn and weathered paint. I love both worlds but they have their place. I love the Roban line of helicopters, I have built several and ALL have looked very nice and flew very well. I even highlight and weather my Roban models to make them look the best that I possibly can. I don’t believe in “secrets” in the modeling community, I believe in sharing all that I have learned in many years of flying full size helicopters and building and flying “scale” helicopters since 1984. I hope to pass along information that will benifit novice builders and pilots in acheiving their goal of building realistec scale helicopters. I will be adding sections to this article as I gather information.
Lets start with Roban models. If you are interested in having a scale helicopter but don’t have a lot of tools or paint equipment, place to paint, workshop or just don’t have all the knowledge to build a model from a fuselage/mechanics kit then Roban is the model for you. You will read lots of horror stories out there about how the Roban models are not a reliable model, read them with care. There are LOTS of happy Roban owners out there as well but they just dont post. I am one of the happy ones. I have built eight Roban models and EVERY ONE of them have been good reliable models with never a problem.
The only thing I dont like about owning a Roban is that there are so many out there and there are a few variations of each model but they all look the same. I like to make my Roban models look different from all the others so I do a few easy and cheap modification to make them look a little more scale. Below are a few easy things I have done to a Roban 800 size Bell 412. First is to “highlight” the existing panal line and rivets. I do this with black or dark gray and silver permanent markers. Using a flexable ruler and tape that will keep the panel lines straight. I go over the panel lines with the dark markers, I then take the silver marker and highlight the necessay rivets to simulate whatever amount of wear you choose. After that I made a slight change in the decals/graphics with something to make the model look different from all the other Roban 412 models.


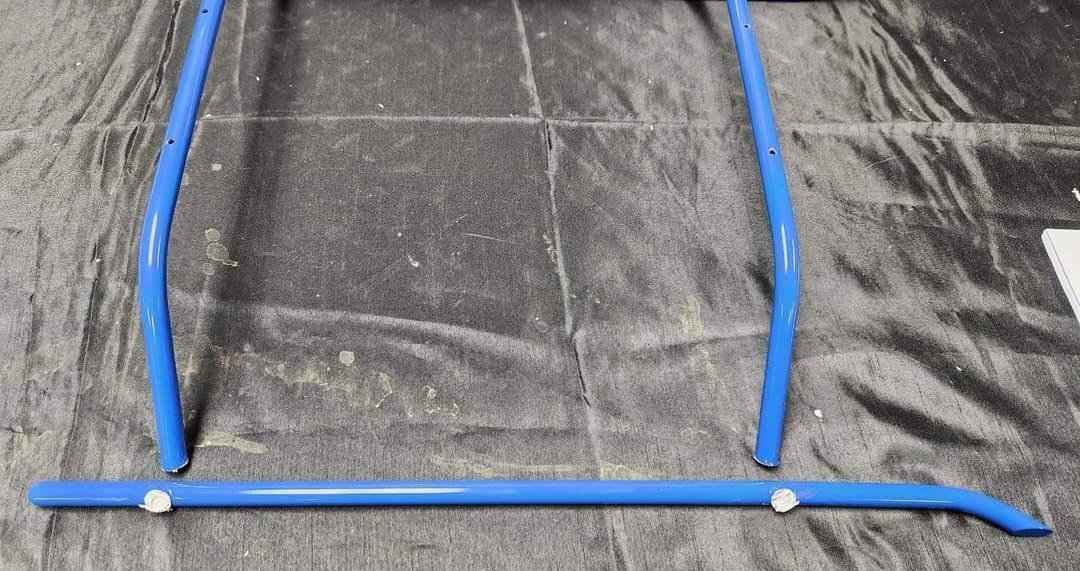


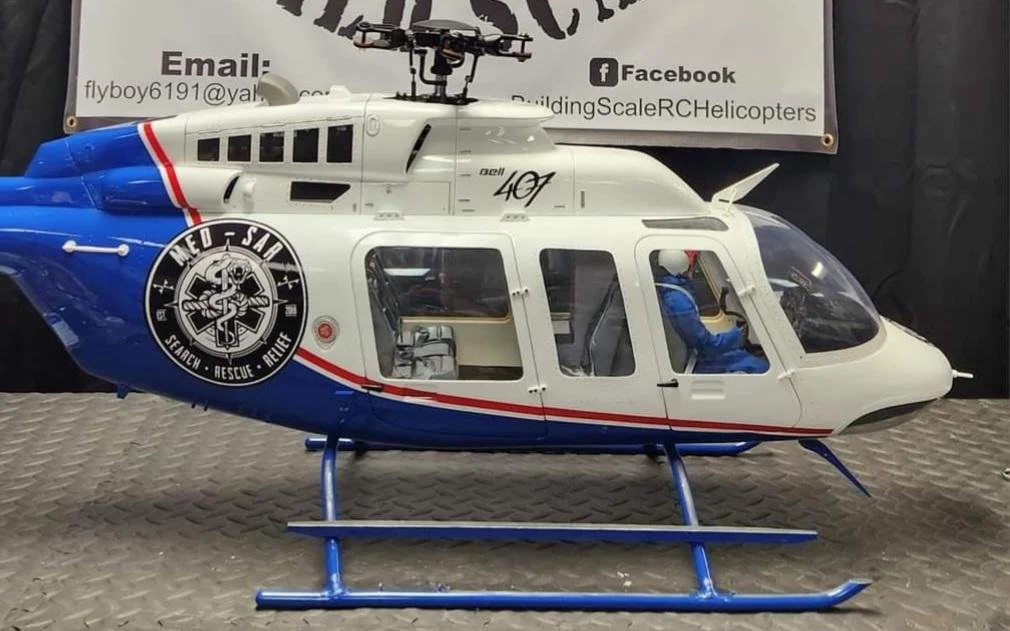
I have taken this Roban 700 class Bell 407 a little further which will require a few extra hours and necessary tools. The landing gear included in the kit work fine but are lacking in the necessary angles to give the 407 a realistic looking stance. I dont have the necessay equipment to weld aluminum so I used the vario method, which I have used on three other models without having any problems at all. One was a Roban, one my 34 pound OH-6 and the other a 1/4 scale Bell 47 weighting 37 pounds.
I started by cutting the crosstubes from the skids and then using a flat file removed any remaining crosstube materials, then drilled holes in the skids slightly larger than the diameter of the crosstubes. I use JB Weld to bond everything together. You can see from the pictures how this was accomplished. I simulated the skid straps with primer and added a few screws for scale looks.


As you can see from the above pictures what a difference these changes can make to add detail and realism to your model. Dont forget to weather you landing gear and apply the “no slip“ to the top of the step and the top of the skids. I make my “no slip” out of flat black paint and microballons ( talcum powder will work just fine ) and tape off the area that needs painting and apply with a small soft bristle brush.
I ALWAYS add a pilot to my models, nothing looks as bad as a helicopter flying around without a pilot AND the pilot can “make or break” a great looking model so choose wisely. The 10 inch pilots from WarBirdPilots work GREAT for Roban 700 and 800 size helicopters. They can easily be sized correctly with a little “Chiropratic Surgery”. They are made with a wire skeleton that can easily be shortened with “Z” bends using small needle nose pliers.
Another thing I am very picky about is positioning of the pilot, I want my pilot to look like he is sitting IN the seat and not ON the seat., lol. I cut the seat out to allow this. Of course you can remove material from the pilot but it is much easier to cut the seat.


I have had builders ask me how I set up my models. Using 3D pitch curves with zero pitch at mid stick just does not give a good smooth linear pitch curve. I hover at half stick which gives a much more linear pitch curve. For my scale flying I like a nice soft collective pitch response using -1 to +9 or +10 ( depending on the weight of the model ). You can adjust the pitch curve at half stick for hover pitch, again depending on the weight of the model. For autorotations I set -3 to +13. At my age I dont like to flip a lot of switches so I only have Mode 2 ( middle position ) for ALL my scale flying and Mode 3 mirrors Mode 2 in case I accidentally hit the switch. I don’t do my scale flying with the auto-rotation settings because it doesn’t give a nice soft collective response. Some guys like to have different modes set up with different curves for different wind conditions, I would much rather learn to fly the helicopter for different conditions instead of flipping switches. Set your pitch curve up in your transmitter and not in your flybarless controller, it allows you to make field changes much easier. ALL my models are set up the same and they all fly the same. When you learn to fly the helicopter instead of depending on a lot of electronics you will be a much better pilot. If you dont believe me, watch my models fly, they speak for my “old school” methods.